*Currently a WIP. I don't know what I'm doing. :')
Okay, so, I am by no means a pro and my art definitely still has a lot of improvement left to do... I've only been doing manipulations for a few months Just a little disclaimer there, lol.
That being said, I figured that bits and pieces of this may hopefully be found useful, especially for those just starting out. I do ask that nobody tries to copy my style completely - take the bits of info that you find useful and make it your own. :3
__________
I usually try to find stock images that already compliment each other when it comes to lighting, however that's not necessary. For this piece, the lighting in the background vs the lighting on the horse are quite different, however the lighting on the horse offers very few harsh points, so it wasn't too hard to "redirect". I did not like the position of his head, so I pretended to be Frankenstein for a minute and this is my monster... Muahaha.
Anyway, as you can see the "parts" don't quite line up, this takes some imagination & general knowledge of the equine anatomy to make the images merge a little better. I try to picture the end result when I do this, because right now it's beyond ugly.
I'll just blend that together for right now. My focus is on the remains of his rider and tack; I like to remove those by selecting colors nearby and using a large watercolor brush on roughly 5% opacity. Don't worry about perfection, just try to get the general coloration right. It'll look rough, but we'll get to the details later. Lightly blur or smudge the whole horse.
Now let's make his head and neck actually look like they belong! Keep your watercolor brush, but turn the opacity down to about 3% and shrink it a little - smaller for finer details. Again, right now we're not worried about lighting in the slightest. Color select the darkest areas on the body, and use that color to go over the darkest areas on the head and neck. Do the same for the lightest areas. If you have a hard time with matching appropriate color tones, feel free to duplicate the entirety of the horse and change him to monochrome, that way you can see what grays come closest to matching up.
Now it's time to go ahead and clean up his edges and do some "sculpting", as his body just wasn't shaped quite right. With the same brush, start blotting in the details. You may find it helpful to look back at the original stock image for placement purposes.
I would typically retain most of the details if the light is fairly harsh, but I'm going for a softer feel so I went ahead and smoothed him out quite a bit, if not too much. I really didn't want a lot of finer details as this piece is about to get rather busy. It is time to start focusing on the lighting, though! I've blotches in some brighter, more vibrant color where the light should hit him most, as well as shading him a tad bit on the off side (I shade with a large airbrush on low opacity, typically on a different layer so I can adjust).
Now for hair.
Hair is exceptionally tricky for me... It's definitely what I struggle with most as far as consistency goes.
I start by roughly sketching out where I want the chunks of hair to go, and then I fade out the ends. Add as much shape/motion as you can, honestly it looks more realistic than trying to get the hair to go all in the same direction. I like to wrap clumps of it around horns, antlers, in this case vines, ect, have it cascade back over the neck... Go wild.
Next up, I take a sharp pen on a slightly lighter color / low opacity and start to sketch the individual hairs. Vary the size of your pen, going from bigger to smaller. Start adding in a few fly-aways. Choose another slightly lighter shade, and do it again - but not quite as much. Repeat one more time.
Boom. Tail added. Anyway, next step is highlights. Make sure your layer is separate, you're probably going to want to lower the opacity later on.
It doesn't make much difference what brush you use, but go back and forth with a light and dark color to emphasize where you want your "shine" to be; I fully recommend using colors that compliment the mane's base color, don't use black for like a creamy mane, for example. Crank up the gaussian blur on your layer, you may have to set it fairly high. Then change the opacity until it fits your desired look. There's a much better tutorial on mane already in the forums, and it's a fairly similar style - I highly suggest looking that one up, as I am bad at explaining things.
Next, I went in and did the same thing - but only with the shadows, not highlights. I targeted the areas where the mane and tail overlapped to add a little more definition. Again, I gaussian blurred it and changed the opacity.
Last, but not least, I use a large airbrush tool and select the brightest color from the background. On a low opacity, like 5%, I brush over the areas that the sunlight would hit. I don't color over just the horse, but also include part of the background. This helps him fit into the scene a little better. I do the same with dark colors, but place them where no light should be hitting. Blending this layer slightly does help, as well as playing with opacity if the colors are too overpowering.
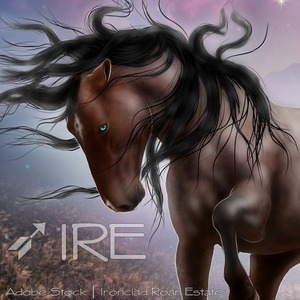
And walla, final result. I may make a tutorial later for individual aspects to go further indepth, as well as for background/foreground tips.
 Morning Showers then Cooling