| |
|
Hi all, as the title says, just wondering if there's anything I'm missing that might make recolouring easier in Procreate?
I like working on a greyscale base to get the muscle definition, highlights and shadows down, but find it really awkward to go in and re-saturate it if I want the end result to be anything other than grey, black or grullo. I'm sure it's in part user error, but any advice would be really appreciated! I'm currently adding an additional clipping mask layer above my base, filling that with my desired coat colour and playing with the opacity until I get it somehwere near right. That, or exclusively using stock that's the correct colour xD Equally, if there are any suggestions for better apps, I'm down to switch! I'm an iPad user, so can only use programmes available on there — I have heard good things about Ibis Paint? |
|  |
|
| |

Art Team
|
Procreate is a great app from what I've heard! I personally use Ibis and love it but no pressure at all to swtich. . One things I would say is to play around with different layer settings. Instead of just using a solid color layer on one opacity or another, try setting it to Soft Light and duplicating it as needed to achieve the vibrance you want. I would also do separate layers for white markings/black points using the same strategy. |
|  |
|
| |
|
Gem said:
Procreate is a great app from what I've heard! I personally use Ibis and love it but no pressure at all to swtich. . One things I would say is to play around with different layer settings. Instead of just using a solid color layer on one opacity or another, try setting it to Soft Light and duplicating it as needed to achieve the vibrance you want. I would also do separate layers for white markings/black points using the same strategy.
Thanks Gem! I liked Ibis for the most recent piece I did, but definitely a different feel to Procreate. I may have to challenge myself to actually do a recolour, rather than waiting for stock in the right colour to magically appear xD |
| |
|
| |
|
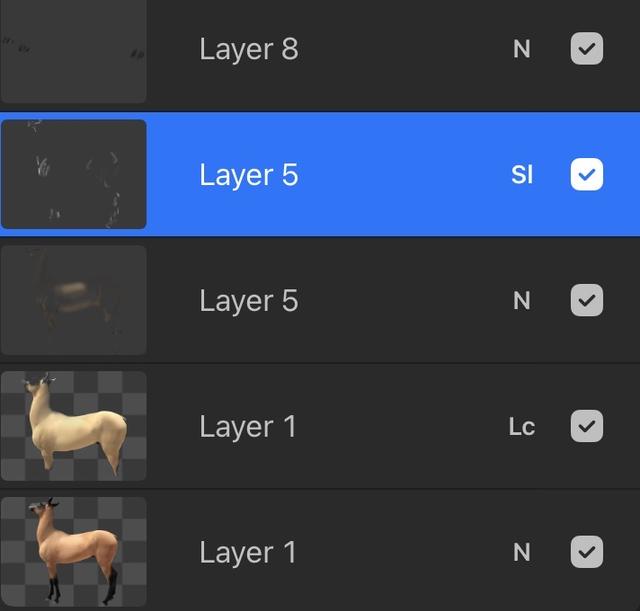
Stock reference: venomxbaby | DeviantArt The main way that I re-color on Procreate, although usually not from greyscale (but that's still doable, just takes more layers and some more adjustments) is Layer Types in combination with using the H/S/B and Curves selections. The original coat color of the reference horse was a bold copper bay. Layer 1 is the smoothened, detailed, tone adjusted 'base.' Adjusted using curves and saturation/brightness. Layer 2 is the duplicated, selection-adjusted re-color layer, erased and feathered to the desired area (body, the base legs are nicely dark enough so there was no need to create extra work by having to re-adjust them in another layer again) modified to Lighter Color layer type. The layer type(s) required for the desired color change will depend on the color theory being used and the desired final effect. You may find you have to 'mix and match' multiple layer types, erasing, blending and adjusting where necessary. Layer types may also create unwanted areas of coloration, as it did on the lighter patches of this reference, (yellow tone + LC created areas of stark red-orange). These are easy enough to cover by creating another layer and simply drawing over them, as seen in Layer 5(N). Further muscular detail was added in Layer 5(SI) just to make some of the definition stand out a little more on top of the color adjusted layer. |
|
|

 High Winds and Drifting Snow