| hOw?! | July 9, 2020 04:28 PM |
|
 |
Gem said:
I think you're off to a great start! The hardest parts of art when you're starting out (in my opinion) are lighting and hair. What art program are you using?
I'm using ibis paint right now, but soon I hope to be using procreate. Also, thanks! |
|
|
| hOw?! | July 9, 2020 04:30 PM |
|
|
Quarter Moon Ranch said:
That second try is everything 😍
Awe thanks! |
|
|
| hOw?! | July 9, 2020 04:30 PM |
|
|
Lucky Ranch said:
Err the imaged got removed
Oop they're back up :p |
|
|
| hOw?! | July 9, 2020 04:31 PM |
|
|
Equestrians dreams said:
Same can't see it!
They're back up! Sorry for the wait :p |
|
|
| hOw?! | July 9, 2020 04:34 PM |
|
|
Soggy Bottom Boys said:
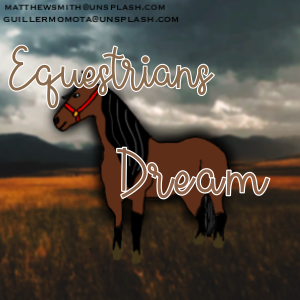
I can't say I'm too great at it either, but I will gladly help you out! 1. Take your horse stock, cut it out. Do not edit it yet! 2. Find a ground stock. Grass is most versatile in this case. 3. Find a sky or background stock that suits the horses lights and shadows. 4. Paste your horse on a layer above your sky/background. Position, flip it to how you want so shadows match the positions of both pictures. 5. Paste your grass a layer above the horse. Continue to add a clipping Mask above the grass and using a black airbrush on maybe 30-40% opacity and brush out the areas you don't want the ground to be in. When using grass, make sure the hooves are a little bit hidden if they are meant to contact the ground. 6. If necessary, I will add another layer between the horse and ground, turn it to "Soft Light" and, matching the light coming from the background's light, I will take and add a bit on the horse, giving it a more natural feel. Sometimes I will also take this time to touch up the horse a bit, add more highlights, darken up some shadows. 7. As I don't have Photoshop, I will save my whole image and enter it into Adobe Lightroom. In Lightroom, if I need to get rid of an ugly brand or maybe a halter or lead line, I'll take the spot correction tool and try to find other spots on the horse or background to match the certain area I need taken care of. Be careful though! If you don't pay attention, it'll look like a monumental blob, 8. After fixing anything with spot correction, mess with the Temp a bit, give it a bright feel or a softer feel. Tint it only if harsher lighting is necessary. I bounce about with Exposure if I need the image to be lighter or darker and Contrast if the image is looking a little too bland. Depending on the harshness of the light, I mess with Highlights, Shadows, Whites, and Blacks. If I'm looking for a bright, heavily contrasted feel, Highlights and Shadows are on almost opposite ends of the spectrum. Clarity is touched up on only if lights and shadows are too similar. If anything, just play around. I like to edit the photo myself and just play around and then go through the Lightroom filters to see if anything suits the mood of the image! 9. After editing in Photoshop, I go back to Medibang with the edited image and do some touchups. Adding in extra light with a "Soft Light" layer, or adding vignettes. Or, adding fog or dust. I do this by using the "Rough Watercolor" brush on very low opacity depending on if it's dust or fog. I match the color of the dirt or sky and lightly brush in a cloud. Then, I continue to lighter and darker areas coordinating with the angle of light. This step can either be done before or after Lightroom. I hope this helps you out! Like I said I'm no expert, but I figured it can give you a hand! :D
Thank you!! This is gonna help a lot! |
|
|
| hOw?! | July 9, 2020 04:41 PM |
|

|
You're very welcome! I'm super glad I can help! :D |
|
|
| hOw?! | July 9, 2020 04:49 PM |
|
|
Your going to be good at it! |
|
|
| hOw?! | July 9, 2020 05:30 PM |
|
|
Equestrians dreams said:
Your going to be good at it!
Awwwe thanks |
|
|
| hOw?! | July 9, 2020 07:05 PM |
|

|
You may want to review this thread involving crediting |
|
|
| hOw?! | July 9, 2020 07:21 PM |
|
|
This is what I did for this image :) Hoping the link works. Sorry for the excess time. Mods: credits are added at the very end of the video |
|  |
|
 Sunny
Sunny

