| |
|
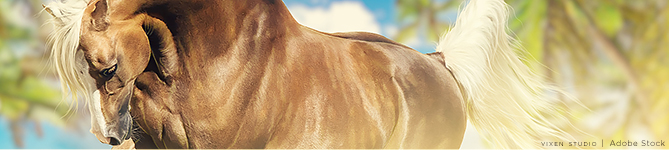
So because of the number of people in the past who have asked me how I do my body prep and me constantly saying Ill make one eventually Im finally doing it! Hurray for procrastination First off I want to say that I use a Wacom Cintiq with a custom PC made specifically for me to doodle and shit. The program I use is Clip Studio Paint (Pro) cause Im just not about that professional lifestyle xD. If you are unfamiliar with my work here are some of my personal favorite pieces of mine Sunflower Piece Caribbean inspired Literal Dragon Pon Sunny's Birthday Gift Badassery Step 1 I want to preface this by saying its taken me a few months to get to this point so do not be discouraged that it doesnt come out how you wanted it to the first few times. I gradually got to this point by a series of small baby steps that I mastered to my capabilities until I got to just painting the body of the horse. So step one is you gotta find a stock photo. Duh! But you want your stock photo to be very easy to pick out highlights on the muscles, lowlights and strong definition. Dark horses and horses that are moving are very good practice for this. Ill show you some examples of both good and bad stock photos for this for beginners. Good Example -This is a good example of strong definition. Why? Because you can clearly pick out where important muscles are on the horse and with that paint a good image. Plus the horse is moving so you can see how the muscles move in this kind of movement. Bad Example - This is an example of a bad stock photo for beginners. Although its a very nice pose and I personally would use it, it doesnt allow the artist to paint a picture that shows clear definition and could easily end up looking like a blob if you dont know where things are supposed to go. ~Now Lets Get It~ So for this tutorial Im going to actually give you a stock photo to use if you want since I think it will greatly benefit you to do this along with me. There is going to be some glowy things around the horse that you dont have to do but there will be a small little tutorial at the end showing how I do those as well Horse To Use For this tutorial I will be going over how I do the body prep of my horses. So first I choose the image, in this case DWPs stock image and I figure out how I want it to look, might flip it, size it, and then I go over it with the select tool. So it looks like this. For this tutorial I will be going over how I do the body prep of my horses. So first I choose the image, in this case DWPs stock image and I figure out how I want it to look, might flip it, size it, and then I go over it with the select tool. So it looks like this.For this tutorial I will be going over how I do the body prep of my horses. So first I choose the image, in this case DWPs stock image and I figure out how I want it to look, might flip it, size it, and then I go over it with the select tool. So it looks like this. You can keep the tail if you arent yet comfortable completely redrawing the tail, I personally like torturing myself and repainting pretty much everything about the horse. So after I have everything that I want to keep selected I click delete outside of selected area and so then it looks like this now. Then I cut out the remaining background and other unwanted things 
To finish off step one I cut out the horse. I always make sure that there is no extra background in my cutouts since that really messes up the painting part. So when you're finished with that, let's move on to step two! As you can see the two back legs are kind of not at all there so Ill be having to completely remake them along with the hooves |
|  |
|
| |
|
Step 2-Kids Lets color Now onto step two, coloring! I’m actually doing a black horse anyways but for the sake of actually showing you how I do this, I’ll be doing it in brown since that’s an easy color change. So what I do is I make a new layer, select the horse and on that new layer color it all in with one color. This is probably the easiest step lol 
Step 3-Blend that bitch! - Brushes I use
- Lighter Brush ~ Soft Round brush(PS) Dip Pen Soft(Ibis)
- Dark Brush ~ Hard Round brush (PS) Dip Pen Hard(Ibis)
- Blender ~ Smudge Tool (PS) (Ibis)
- Hard and soft Eraser ~ Pretty self explanatory
In this step we will do the actual painting now, how fun! This is the step that takes the longest out of all the things I put my poor art pieces through with it usually taking me anywhere from 2 to 5 hours. Sometimes eight like in the case of Sunstone Elites piece where I kind of went all out lol But generally I average 2 to 5 hours on the body prep.
The first thing I do is make sure there are no stray pieces of the background still in the horse's picture, and if they are I just erase them. Next I go onto the layer with the solid color and take a shade darker than the base and start making the basic outlines of definition on the horse. This is with a bigger brush but I don’t want it to just be a blob so I make sure to have actual definition like on the neck, legs, and especially the face. For this step I use a lighter brush. When I finish it I blend, making sure there are somewhat hard edges and extremely soft edges where they need to be so it looks like this. 
After that I repeat the process going as dark as I need to and becoming more and more defined, and blending it more so it’s more cohesive. 

|
| |
|
| |
|
Step 3-Blend that Bitch! Next I make a new layer, this is for the highlights! So what I do is I take a slightly lighter shade than the base coat, and I usually make it a bit more saturated, and go over where all the horses highlights are, you want to be as precise as possible when it’s highlighted the markings and more “blobby” with the more general highlights. Next I take the blender tool, and go over the edges of the highlights and for the more general highlights make them a little more blended.  Then I make another layer, and set it to glow dodge or whatever the equivalent is for you This is what Glow dodge does I take a small lighter brush and make it a light grey and go over the more defined highlighted areas, and then I blend with a smaller than lighter brush blender tool Then I go over with a darker brush sized around 2.5 pixels for the face and legs and around 5-10 pixels for the body and go over the same things as I did with the lighter brush but even more defined. And once again, blend it! But I want it to be much more prominent so the blending isn’t that harsh 

|
| |
|
| |
|
Step 4 - Finishing Touches - This step includes the following
- Eyes
- “Hair” texture
- Glowy Stuff
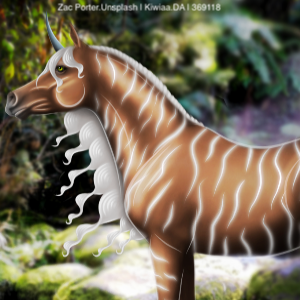
Eyes ~ So for eyes I usually pick a color that either actually matches the horse's eyes, or I pick a color that’s already from the background. Now for this piece in particular I’m going to be doing that glowy eye thing you can find in a lot of my pieces so I’ll just be doing this for the purpose of tutorial. So what I do is I’ll do hazel/green eyes, so I’ll pick a color that is a good base color and then I’ll make it lighter around the middle of the eye. Eye Then I go in with the darkest color on that colored side and go over the top of the eyeball with it. And I’ll slightly blend Glowy Stuff ~ Again I think this is pretty simple but here’s how I do my glowy stuff a good example of it is the “Caribbean Inspired” piece. So what I do is I take a lighter brush and I make it the color I want the glow to be, usually the darkest shade of it and I just make random smoke-y shapes. Then and I bet you can guess what I’m about to say.. I blend it! XD Make sure this layer has an “Add-Glow” filter. The whole process looks like this 


|
| |
|
| |
|
Color Changing can always be a little difficult but is ultimately something everyone going into digital art should know how to do. And although I'm not the best color changer (Hint why I draw my horses ;P) I do know a few things that can make it easier! Like the Overlay Method! The Overlay method is actually pretty simple, and quite possibly the easiest way to do a color change other than just repainting the entire horse. So what you do is you do step two and then make that new layer Overlay! Then you just have a blast with the Color Balance, Hue/Saturation, and Tone Curve Slides! NEVER use the brightness/contrast slides... They are sadly never going to be your friend So first off all the color, and I mean all of it is going to be on one single layer of that overlay layer, cause if you have ever tried to stack two overlay layers onto each other it becomes a blob. SO one layer, all the color. I start with toning up the horse, so now it's kind of really bright and make it more Blue/Cyan on the color balance slide Next I tone it down just a bit and make it a little bit more Red/Green/Yellow on the Color Balance Slides Then I go into Hue/Saturation and bump up that saturation to get some color in Then I go back and tone it down and once again make it more Blue/Cyan on the Color Balance Then I make the horse layer underneath brighter and make it more Cyan/Green/Yellow I've toned it down a bit more, mostly on the highlights and made the overall coat brighter, and made the color more Blue/Red I decided to make dapples, and I did that by making a new layer and using a brush I created started brushing in dapples around the base of the horse and blending a bit. I also gave it a grey muzzle and messed around even more with the color settings With Dapples Now what about roan??? That's actually pretty easy. Let's do a nice red roan just to show the difference So when picking colors I should add you want it to be the most base color you could imagine, I usually pick my base colors in the middle of my color wheel since they are the most neutral. Since these are the "dark" points the white just goes over it like this, you can make the roan not as white, or even white but make that more towards the back and middle as that is where the least amount of red will be Next blend! Add darker points or even white markings the same! |
| |
|
| |

|
Very helpful Tasi! Just wanted to add for fellow Ibis users, the smudge tool at around 20-30% strength with a small soft brush works pretty well instead of blend. Dip Pen Soft and Dip Pen Hard work fairly well in place of the Clip Studio brushes, although I haven't hunted around to find the best. And a couple different layers on Luminosity instead of Glow :) I'll definitely be using this in full for one of my next pieces, but here's my test run :D 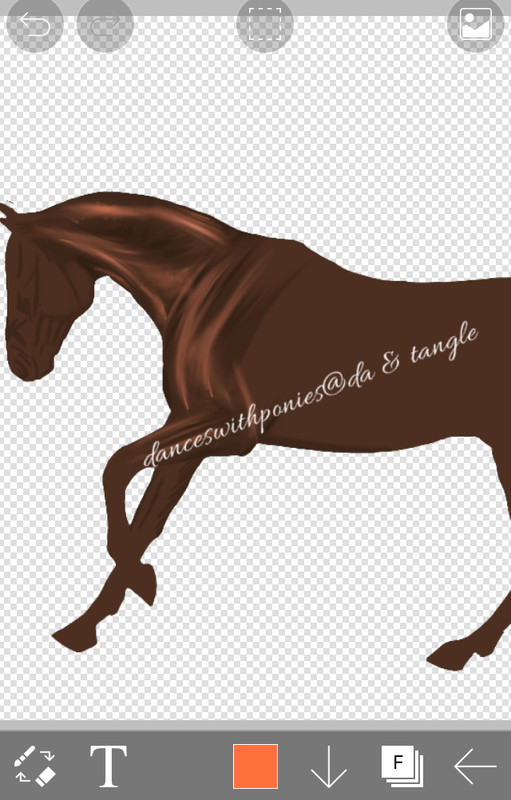
|
|  |
|
| |
|
Have a question. Let's say I'm doing blood bay? What base color should I choose? Along with roan. |
|
|
| |
|
That will actually be part of the color change, and for roans I usually color the whole horse, finish it then duplicate the colored horse layer and make it brighter where it would roan and I desaturate the layer, I do this a little at a time and mess with the color balances and then I erase the layer with a soft brush on the head, and legs and anywhere else I think the roan wouldn't be And thank you Tanglewood!! I'm sure that could help a lot of people |
| |
|
| |
|
|
| |
|
blender = smudge tool in PS |
|
|
 Morning Showers then Cooling


