 01:25:31 Aussie - Golden Diva!
and it's fine Dulcie, we all do it |
01:06:20 Dulcie/Crazy | I play to much at night lol |
01:05:46 Dulcie/Crazy Her wk 7 said 333233
So I knew I did something wrong & assumed I knew what it was since I didn't attempt to record her wk 8 |
01:04:05 Dulcie/Crazy I think I made a mistake?
I thought that was a tobi boy
So uh yeah
Don't pay any attention to that
I'll do the awake & thinking part tomorrow |
01:03:10 🛸Divaaa| Are you sure she was up 5 bars on week 7 and not 8 ?? |
01:00:32 Aussie - Golden| Dulcie... they don't match... at all... |
12:47:31 Dulcie/Crazy Thoughts on this match??
-HEE Click- |
12:41:26 Ari <3| Not sure yet, possibly! And bye! |
12:40:36 Aussie - Golden| breeding the bestest worsts Ari? |
12:39:47 Aussie - Golden i cull at week 10.
if their not level 2 by then...
with gelds week 9 |
12:39:25 Ari <3| I think I'm going to breed my colour breeders tonight 👀 |
12:38:12 Bazz| I do that but I also like to see what their training is like to see if they are ready yet haha |
12:37:18 Aussie - Golden| Bazz i just use easy show enter lol |
12:36:45 Bazz| Ru, my boys are the same! Trying to work out who to enter sometimes isn't fun |
12:32:50 Ru| My geldings are all over the place with their training |
12:32:25 Grape | X hoarder I do my best to explain, but it's hard to make it make sense outside of my head xD
Anywho, got work tomorrow so it's time for bed. Have a good night! |
12:31:14 Ru Grape
Oh, makes sense. Thanks! |
12:27:51 Grape | X hoarder Always glad to help<3
Ru, no. I go through by hand and enter all who are up 3/3 for the discipline I'm entering, so 2 bars in all 3 stats for a level one. A lot of them don't show well anyways, though. The ones that do bad get tossed till next week and Tues-Wed I only enter greens in easy show. |
than 1 day
before you can use our chatbox.
Rules Hide
You are in: Main Chat
View Sales |
| Year: 178 Season: Summer $: 0 |
Tue 01:35am CDT | | Forecast:  Spring Showers Spring Showers | |
|
Forums
→ Horse Eden is a fun game! Sign Up Now! ←
| | 
|
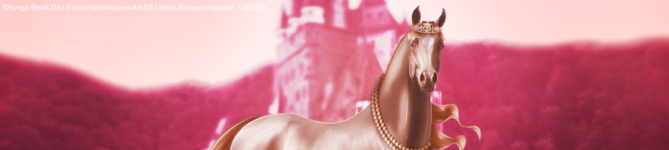
So I promised a few of you one of these, and I've been meaning to make an update one for you all! I use IbisPaint X the app is really easy to navigate around and great to use if you know what outcome you'd like! Below I'm posting my most used brushes. I use these for ALL my pieces.  Please note that my way won't for work everyone. :) Please note that my way won't for work everyone. :) this is the horse we are doing the arts for. For lovely AL 💜 Please note this is going to be a very long, beginner friendly tutorial! With a lot of images on what I'm talking about/ the art itself! |
|  |
| | |
|
What's in this tutorial? In this tutorial I'll show you numerious ways I do art. Including Body prep, colour changes, white markings, lighting, hair and grounding.
Part 1: Colour changes.
Part 2: white markings
Part 3: Body prep
Part 4: Hair
Part 5: Lighting/shadows
Part 6: Grounding/other
I REALLy DO believe IbisPaintX is a great app for beginners, and even more experienced artists!
i hope this tutorial helps! |
| |
| | |
|
Part 1: So because this was a YHH auction, my horse is already greyscale. HOWEVER, I'm going to show you how to do that if you don't already know.
this is what I'm starting with: - Origionally the horse was a palomino, and to turn it grey scale is really simple. I go to the filters that are along the left side.  - In here you'll find all sorts from colour balance, to god rays. I scroll across till I get to the grey scale option. Press on it and the default setting should be: 0% brightness, 0% contrast like the image below.  Now I Do play with the brightness depending on the horses colour. For example, if the stock was a dark bay/black I'd lighten it, but because this one is just a Pali, I leave the settings at their default. Press the green tick along the side. It won't save unless you do.- Now, make sure your on the horse layer and make it an alpha layer. We need this as we are about to make another layer a clipping layer into the horse layer. You'll find the alpha and clipping below the layers.  - THEN, you want to add a new layer above said horse layer and make it a clipping layer. Like below  it's vital to have a clipping layer, and the main layer as an Alpha layer, then when you have to colour the whole horse like we are about to, it will stay inside the horse ONLY. - Next you want to sort the layer that we just made a clipping layer. Beside were we just made the layers alpha/clipping there is a drop box, which by default says ' Normal'.
 Press on the drop box and there will be a long list of layer sorts, scroll to the bottom and you'll see 'colour'. Press on that, then press anywhere on the app, it'll close the drop box then you have a clipping layer that's sorted for what we are about to do next. - Using the Eyedropper at the bottom of the tab along the left (see first full image above if confused) and pick the lightest colour you can get on the horse.  - on the layer we just made a clipping layer(and a colour layer), select the Airbrush 20% brush (I'll be near the top of the list) and colour over the whole horse.
Once you have, you should have something like this (it'll be different every time depending on what colour you pick from the horse VERY orangey right now. Not the colour we need.
Below the layer sort, alpha and clipping layer options are. There's an opacity bar, lower the opacity of the Colour layer.  Here I lowered the opacity to 48%. However I do play with this throughout the whole piece. - once I'm happy with the colour I merge the layer down, using this button here:  NOTE: NOTE: the horse layer will then no longer be an alpha layer. But that's fine. Just remake it an alpha layer ready for later on! - IF I wasn't going to add white markings, I would do the exact same but with black to make the dark legs.. but again, that's something that can be done AFTER.. now we move onto the roan/markings :P |
| |
| | |
|
Part 2 - MARKINGS, sometimes fun, sometimes not. I dont mind doing them. However, I do find certain ones extremely challenging! Im still learning to this day how to do it. So let's get into it! - Using the Lasso tool, I very roughly begin to mark out the markings. I do tend to make them bigger as I do go in with an eraser to clean the sharp lines!
here's a start to the face markings:  I will do this over the horse following as closely to the markings as I can - you should then have something like this. Remember it's not supposed to look perfect here, this is a very rough outline of the markings. More detail can be added later on.  - I then want you to duplicate the horse layer. To do this, you click to see the layers and on the left there's a row of options, a + sign on its own, another + sign in a box, a camera and your overall flip buttons, you want to click the one with the '+' in the white box.  Once you've done this, remove all lasso items, and turn the duplicated layer into a clipping one. While also removing the Alpha layer. - now you want to go back into layers again, making sure your on the layer which we just had duplicated. This time you want his saturation and brightness.  You want to move the saturation all the way to the right making it -100%. Then you want to move the brightness up, do not make it too bright as you'll then lose the definition on the horse. This is usually where I keep my markings at Don't forget that this will be different for every stock image depending on colours etc. - next, you want to go back into filters, but this time you want Tone Curvs. This is a premium filter however the app is so cheap and you can use it for free if you watch an ad :) but you could possibly get the same affect using the brightness and contrast. with this, i heighten the output, and lower the input.  - this is the effect it gives me.  - This step proves it is so important to duplicate the horse layer as a new layer during the lassoing as I go in with a crayon eraser, and begin marking the markings correctly!  - Just like this you want to go round the markings replicating the horse your working on. Here you can see the edges are softer around the face and I have began adding the details  - okay so this is what I have, perfect? No. But I can add more white markings later on.  As you can see the Edges are much softer now. - now for the roan. Something I hated for a long time. for the roan, you want to duplicate the horse layer. Remove the clipping layer of the markings (just for now) and make both the original horse layer and the markings layer unseeable, like below.  - now you want to erase the parts of the horse that aren't roan (make sure this is only done on the just duplicated horse layer. Make sure your erasing with the AIRBRUSH 20%, exact same brush as the pen, but it's an eraser this time!
It should look something like this:  - now, I want you to make the original horse layer and the Colour layer visible. Using the image we just erased some of, you want to go back into hue saturation and lightness, and make the horse grey again. Like this Make sure it isn't as bright as the markings layer.. - next, you want to lower the opacity of the roan layer.. this always changes for me. Depending on the level of roan. That sounds daft, but I've made the blue roans, roan layer lighter due to it fitting the image/matching as well as I could. so play with the opacity until you're happy with it.  - now the Dun. I make the roan/markings clipping layers into the horse layer, under both the roan layer and the markings layer, I go in with the airbrush pen (20%) and add the dark areas. On the withers, knees, face (if any)  - that's all I do for markings. It's exactly the same each time. Again, this works for ME. Not guaranteed to work for you.
Onto Body prep! |
| |
| | |
|
Part 3 Woooo body prep. For this section you'll be using the chalk brush and the smudge tool!
- firstly, add a new layer on top of what we have already done.
And make the layer 'soft light'  - on this layer, using the white chalk pen, go over the horses muscles/details. Body and head.
once you've done it, it should look like this:  these can be messy lines, we are going to smudge them anyways. One you've started smudging you can go back with the chalk and go over any bit that you think needs a bit extra definition!once it's all smudged, it should start looking something like this - now you want to do the exact same thing but with black. Define muscles etc, then smudge them in. Make sure the layer is soft light like the white one :D -
unsmudged: - smudged:  - I do go do the exact same thing (shadows) but only on the face, as sometimes I think it needs a little more definition. That is all I do for body prep, sometimes I'll smudge the whole horse before hand. But I'm much referring this way as of right now |
| |
| | |
|
Part 4: Hair So for the mane and tail I use the round brush (rough). I really like the texture of the brush, and I think it gives a nice overall feel to it once everything is together.
so for this part, that's the ONLY brush you'll be using.
- To begin with I mark out the mane and tail using a colour that isn't on the image. When I originally drew this out, it were In red. I used the hue saturation and lightness to get it to white.
Don't be afraid to go messy with the hair! My only trick with manes and tails are, I wing it. Wherever I decide to draw it out first, I'll follow (if that makes sense) I just let my hand and mind go with it. There's not secret to being able to do a mane and tail, it's just practice, practice and more practice.
So this is what I'm starting with:  - This horse has a black mane.. so I'm going to go into filters again, select Mono colour, and set the colour to a grey ad the horses mane is black. I do it so light so I can map out the directions and detailing!   Now you should be here:  - using the Eyedropper tool, pick the colour of the mane and tail. Now you want to make the colour slightly darker than the colour we just changed it to.
As you can see here, I don't make the first layer as dark, but if you do. Don't forget you can use the opacity to lower it!
 - Now we have our default colour, you need to go to the little hand in the top right corner. It'll look like this:

on there you'll come to a small menu like this:  These are the default settings. These are the default settings.I change these, I turn on the force fade, and the shape of fade! this helps give the short end and start of the pen flow.
- Without the fade, and with: - Once you have the force fade on, the round brush (rough) AND the colour you'll be using. Add a new layer on top of your mane layer and begin mapping out the direction of the mane and tail.
note: I use a new layer for every colour of my mane and tail. Only when I know I'm happy with that colour layer, will I merge it into the mane layer This is where you should now be! We have the base done, and our direction layer complete.  - NOW make an even darker colour than the one we just used, and begin adding in any folds in the mane/tail, any darker areas (following the light source) from doing this, this is now what I have:  Because the mane is supposed to be black, we need to make it darker, if your happy with your shadow colours, merge them into the mane base layer! to darken it, I use the brightness and contrast filter!  - we lost a few of the details in the mane and tail by darkening, however we are now going to give the shadows, shadows! Using black, and on a different layer, start slowly drawing in the shadows:  - next you want to take a lighter colour, and start keying in the lighter hairs, instead of going through step by step here, I'll show you progress images.
Each new colour (it should get lighter everytime) must have a new layer so you can mess with the opacity!   - that's it for the mane and tail. I tend to use between 15-20 different lays for the mane/tail. But it's up to you how much depth you'd like.
onto lighting! |
| |
| | |
|
Part 5: Lighting/shadows.
For this part, you need the airbrush (20%) brush, at 50% opacity. Make sure you turn off the fade the same way you turned it on.
your also going to want your horse layer, main and tail to be Alpha layers.
- Horse: Now, I always do the shadows first. Adding a new clipping layer onto the horse. Slowly and lightly begin adding shadows where the light *Does Not* hit.

we can add MORE shadow later on.
- Now, add a new layer above the shadow layer, make that layer an 'overlay' layer (exact same way with the drop box as further up). make the colour white. now you want to go over the horse where the light *Does* hit.  - now do the exact same with the mane and tail!
Before:
After: 
- My lighting changes depending on the BG.. but that's it for this one! Pretty straight forward and easy :) |
| |
| | |
|
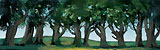
Part 6: other because this horse isn't actually on the ground. My other section will be my finishing touches! - the pink nose! Adding yet another layer onto the horse layer, you want to sort the layer to linear burn. Select a light pink colour and go over the nose where the little pink spots should be: play with the opacity, making sure it isn't too light but not also too dark.  - Colour hue.
to make the horse match the background. I add a new layer onto the horse layer, making sure it's on top of all the others, make it another 'colour layer' and use the eye dropper to pick colours from the back ground to add onto the horse. Again, play with the opacity of the layer again until the horse fits how you like (this doesn't need to be done everytime!) - as final touches I like to outline the horse in white with the dip pen (soft), I also add a layer behind the horse to brighten it a little. Then I finally blur the BG.. I'll post the finished product below! Tadaaaa - Im sorry, I know this was long, but I also wanted to make it beginner friendly for those who are new to or thinking of trying IbisPaintX! I hope this helps you lovely lot 💜 |
| |
| | | 
|
This helped me so much, thank you for making a tutorial Zomb!! The finished piece is gorgeous <3 |
|  |
| | | 
|
This is so helpful, I have not been able to figure out roan for the life of me - so clever!! And I love the way you do those scary sabino markings <3 |
|  |
|
Refresh
|


